
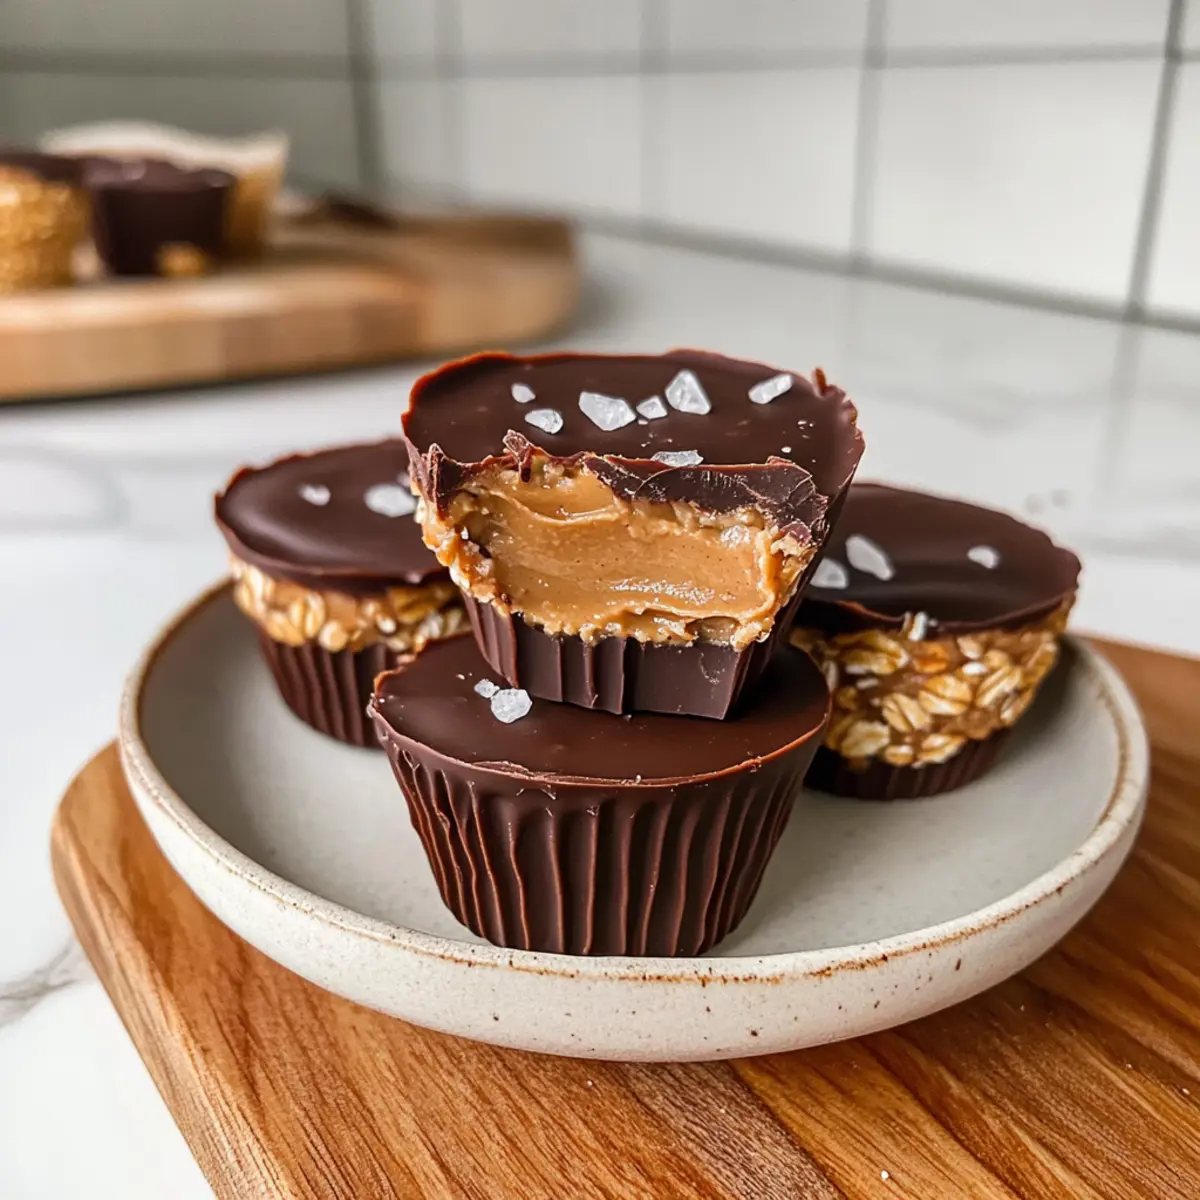
In the whirlwind of daily life, I often find myself yearning for something quick yet deeply satisfying, and that’s where these delightful No-Bake Peanut Butter Oat Cups come into play! Ready in under 20 minutes, they’re the ultimate treat for anyone craving a homemade snack without the fuss. Combining the creamy richness of peanut butter with the wholesome chew of rolled oats, these cups offer an irresistible bite topped with a drizzle of melted dark chocolate. They’re not just a sweet indulgence; they’re gluten-free, vegan, and perfect for satisfying that mid-afternoon craving or curbing the temptation of fast food. Plus, they store beautifully in the fridge or freezer, making them a great make-ahead option for busy days. Are you ready to whip up a batch and experience a little piece of heaven?
Why are Peanut Butter Oat Cups amazing?
Quick and Easy: In just under 20 minutes, you can whip up these delicious treats without any baking!
Nutritious Satisfaction: Packed with wholesome oats and peanut butter, they’re a great source of energy for busy folks.
Versatile Treat: Substitute ingredients easily to cater to dietary needs – try almond or sunflower seed butter for nut-free options!
Crowd-Pleasing Flavor: The delightful combination of creamy peanut butter and rich chocolate will make these a hit with friends and family.
Make-Ahead Convenience: Store them in the fridge or freezer for a ready-to-go snack that’s perfect anytime. Just like my Garlic Butter Chicken or 4-Ingredient Chocolate Oat Cookies, these cups are a fantastic solution for those hectic days!
Peanut Butter Oat Cups Ingredients
For the Base
- Peanut Butter – Adds creaminess and richness; swap with any nut or seed butter for a nut-free option.
- Old Fashioned Rolled Oats – Provides structure and chewiness; can be substituted with quick oats for a slightly different texture.
- Maple Syrup – Adds natural sweetness; you can replace it with honey or agave syrup for alternative sweetening.
For the Topping
- Chocolate Chips (melted) – Used for topping, adds sweetness and flavor; opt for dairy-free or vegan chocolate if needed.
- Flaky Sea Salt (optional) – Enhances flavor, especially against the chocolate; feel free to omit for a simpler treat.
Step‑by‑Step Instructions for Peanut Butter Oat Cups
Step 1: Mix Peanut Butter and Maple Syrup
In a medium mixing bowl, combine 1 cup of creamy peanut butter and 1/3 cup of maple syrup. Stir them together vigorously until the mixture is smooth and well-blended, which should take about 1-2 minutes. You’re looking for a silky consistency with no lumps. This delicious base is what makes your Peanut Butter Oat Cups rich and tasty!
Step 2: Add Rolled Oats
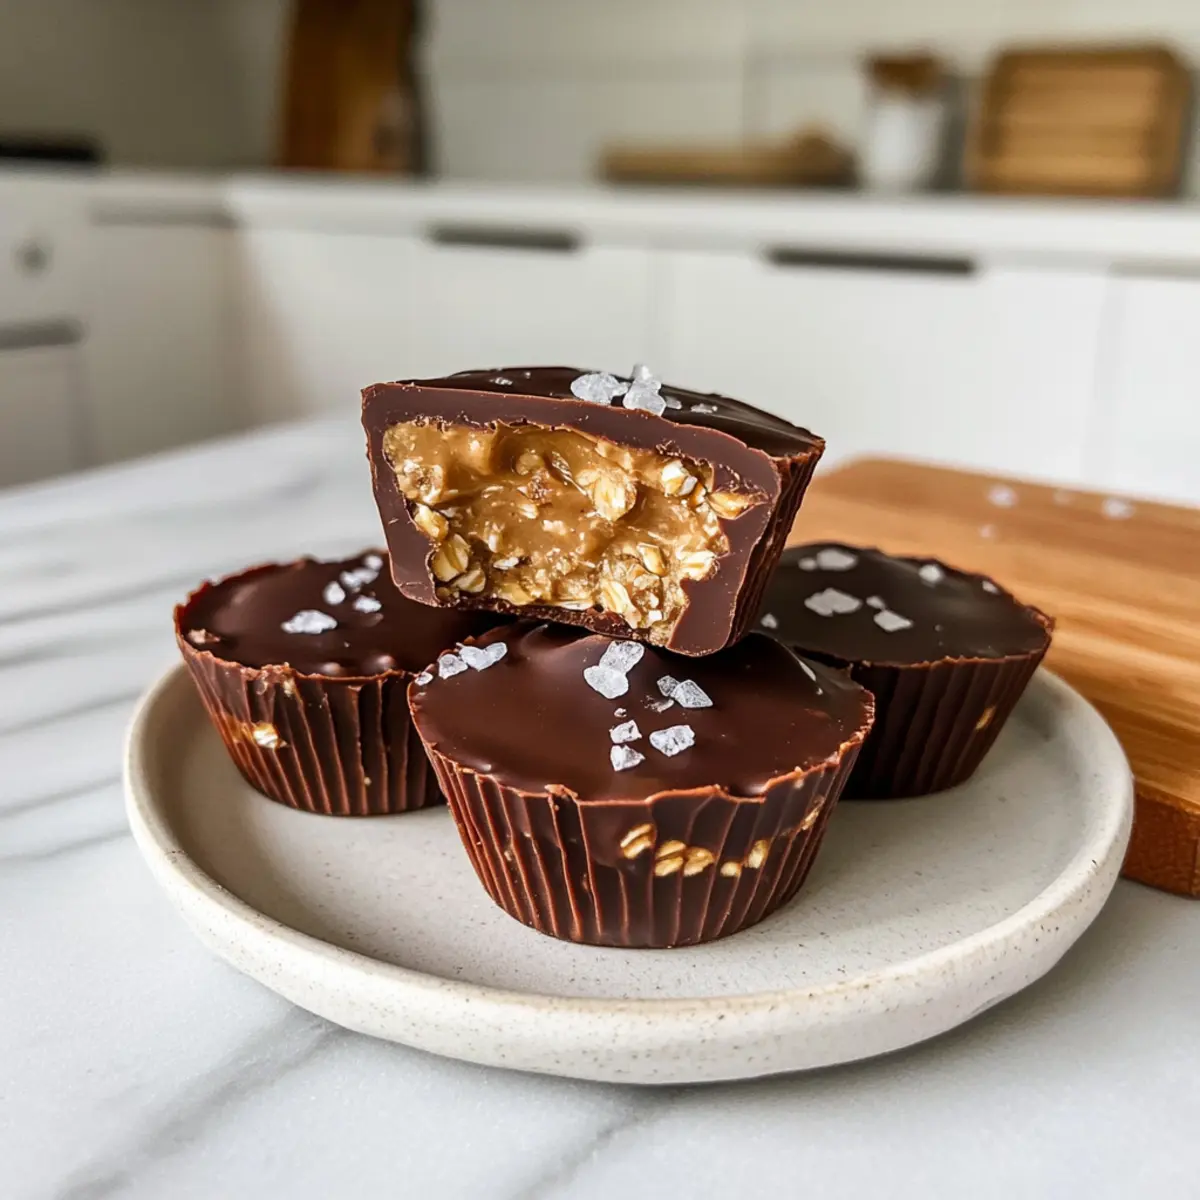
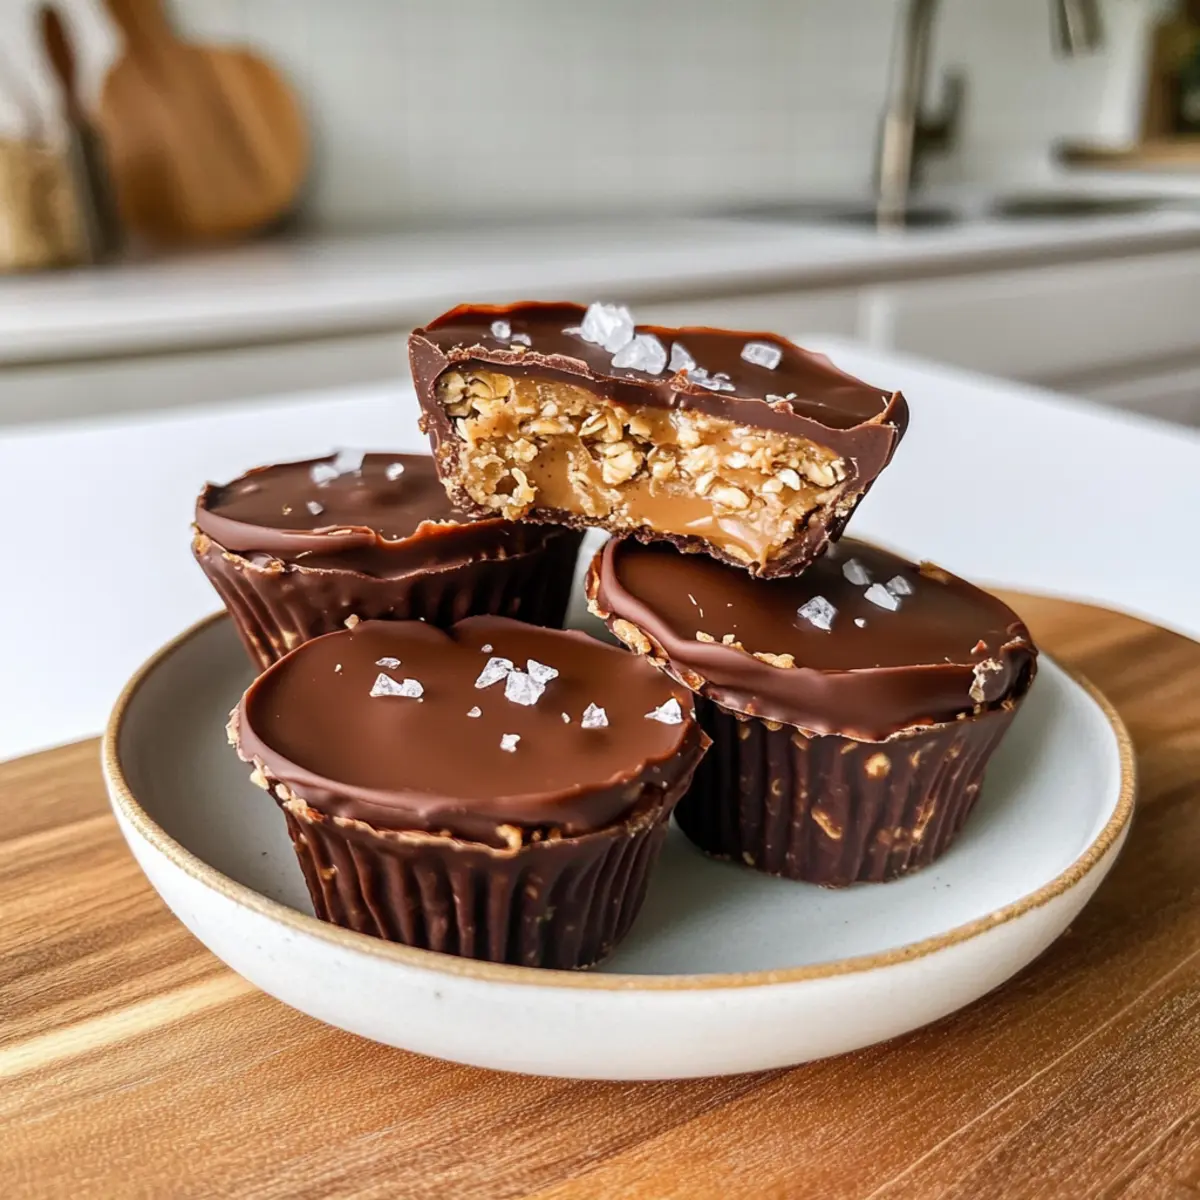
Next, introduce 2 cups of old-fashioned rolled oats into the peanut butter mixture. Using a sturdy spatula, fold the oats into the mixture until everything is uniformly combined and every oat is coated. This step usually takes about 3-4 minutes. You’ll know it’s ready when the mixture holds together when pressed; it should be thick and slightly sticky.
Step 3: Press Into Molds
Take your silicon molds and scoop about 2 tablespoons of the oat mixture into each cavity. Use your fingers or the back of a spoon to firmly press the mixture down until it’s compact and even. This should take roughly 5-7 minutes. Ensure the top of each cup is level for a smooth finish and to hold the toppings well later.
Step 4: Prepare Topping
In a microwave-safe bowl, add 1 cup of chocolate chips with a teaspoon of neutral oil. Microwave the mixture in 30-second intervals, stirring in between, until fully melted and smooth, which typically takes about 1-2 minutes. Allow the melted chocolate to cool slightly before proceeding. This luscious layer will enhance your Peanut Butter Oat Cups delightfully!
Step 5: Chill and Top with Peanut Butter
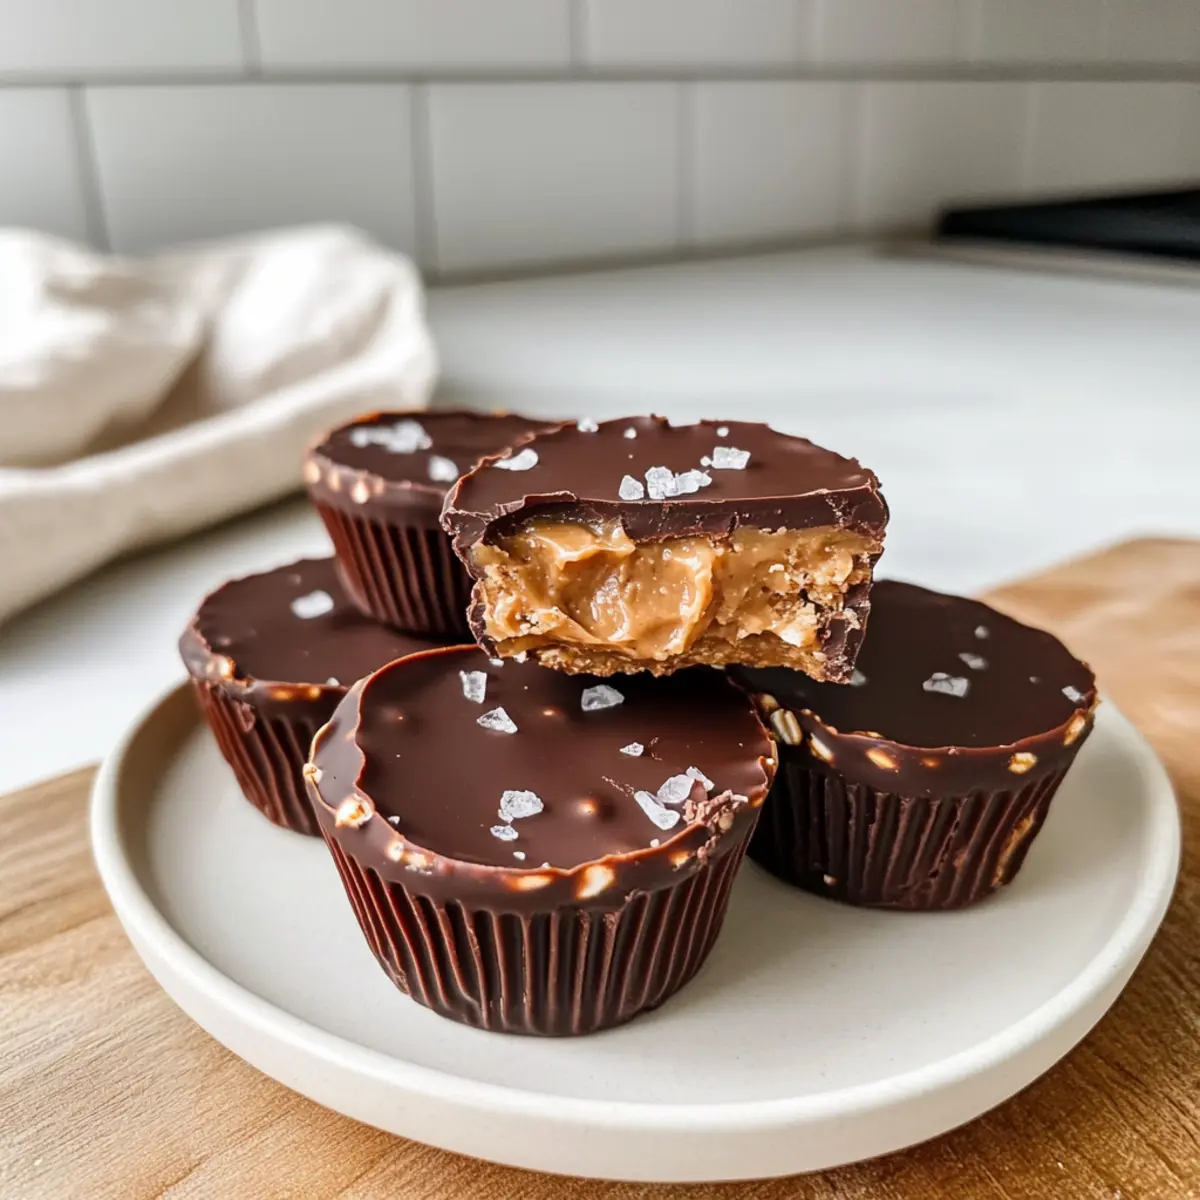
After pressing the oat mixture into the molds, refrigerate them for about 20 minutes to firm up. Once set, take them out and add a small dollop of additional peanut butter on top of each cup. For an extra protein boost, consider mixing protein powder with the peanut butter before doling it out. This step will add richness to each bite!
Step 6: Drizzle with Chocolate
With the oat cups chilled and the top peanut butter layer added, it’s time to drizzle the melted chocolate over each one. Using a spoon, carefully create a lovely swirl of chocolate, ensuring even coverage over each cup. Once decorated, place them back in the fridge for another 20 minutes; the chocolate needs to set for that perfect final touch.
Step 7: Final Touches and Serve
After the final chilling, gently remove the Peanut Butter Oat Cups from the molds. If desired, sprinkle a pinch of flaky sea salt on top for an added flavor twist. Now they’re ready to enjoy! Serve them chilled or at room temperature, and be prepared for everyone to love these delightful homemade treats.
Expert Tips for Peanut Butter Oat Cups
-
Use Silicone Molds: Choose silicone molds for easy removal; they help keep the cups intact and make serving a breeze.
-
Check Consistency: If using creamy peanut butter, ensure the mixture is firm before serving. Adjust freezing time as needed to achieve the right texture.
-
Melt Chocolate Carefully: Gradually melt the chocolate in the microwave, stirring frequently to prevent burning. This will give your Peanut Butter Oat Cups a smooth, glossy finish.
-
Customize Sweetness: Taste the base mixture! Adjust the sweetness by adding more maple syrup or swapping it out for honey or agave, depending on your preference.
-
Flavor Bundles: For an extra flavor boost, consider adding vanilla extract or a pinch of cinnamon to the peanut butter mixture before combining with the oats.
Peanut Butter Oat Cups Variations
Feel free to get creative and customize these delightful cups to your taste and dietary needs!
- Nut-Free: Swap peanut butter for sunflower seed butter to create a nut-free alternative that is just as delicious.
- Protein Boost: Mix in a scoop of your favorite protein powder with the peanut butter for a healthier snack that fuels your day.
- Gluten-Free: Ensure you use certified gluten-free rolled oats to keep this treat safe for celiac friends.
- Different Sweetness: Substitute maple syrup with honey or agave for alternative sweetness, tweaking to your taste.
- Chocolate Lovers: Elevate the flavor by adding chocolate chips directly into the oat mixture before pressing into molds.
- Spiced Delight: Sprinkle in a bit of cinnamon or nutmeg for warm flavors that dance through your deliciously chewy cups.
- Syrup Swirl: Drizzle a bit of fruit syrup over the top after chocolate for a fruity twist that complements the peanut butter beautifully.
As you explore these variations, remember that similar quick treats can also be made with my 4-Ingredient Chocolate Oat Cookies—perfect for those who love a bit of chocolate with their wholesome indulgences!
How to Store and Freeze Peanut Butter Oat Cups
Fridge: Store your Peanut Butter Oat Cups in an airtight container in the refrigerator for up to one week. This keeps them soft and chewy while maintaining flavor.
Freezer: For longer storage, place the cups in a single layer on a baking sheet to freeze initially. Once firm, transfer them to a freezer-safe bag or container. They can last for up to 3 months!
Thawing: When ready to enjoy, simply thaw the cups at room temperature for about 5-10 minutes or pop them in the microwave for a few seconds to enjoy them slightly warm.
Make-Ahead: These treats are perfect for meal prep! Make a batch and store them ahead of time, so you always have a delicious snack on hand.
What to Serve with No-Bake Peanut Butter Oat Cups?
These delightful little treats are the perfect base for building a full meal that satisfies both sweet cravings and nutrition needs.
- Fresh Fruit Salad: A medley of seasonal fruits adds a burst of freshness that balances the rich, creamy flavors of the oat cups.
- Greek Yogurt: Creamy, protein-packed yogurt drizzled with honey or maple syrup enhances the indulgence while keeping things light and fluffy.
- Nutty Granola: A sprinkle of crunchy granola provides a satisfying texture contrast, making each bite of peanut butter bliss even more exciting.
Imagine enjoying your peanut butter oat cups with a vibrant fruit salad; the juicy sweetness complements the chewy richness perfectly.
- Plant-Based Smoothie: A chilled banana and spinach smoothie brings a nutritious boost, perfect for a mid-afternoon snack or breakfast on the go.
- Chocolate Almond Milk: An irresistibly smooth drink that complements the chocolate topping of the oat cups and adds a nutty, sweet finish.
Pairing these oat cups with creamy Greek yogurt or a refreshing smoothie creates a delightful snack experience. They can be enjoyed chilled or at room temperature!
Make Ahead Options
These Peanut Butter Oat Cups are perfect for meal prep enthusiasts! You can mix the peanut butter, maple syrup, and oats up to 3 days in advance, refrigerating the mixture in an airtight container to maintain freshness. When you’re ready to finish them, simply press the mixture into silicon molds, chill for 20 minutes, and add your toppings. If you’d like to prepare the cups as a whole, freeze them for up to 1 month—this way, they keep their delicious flavor and texture! Just remember to thaw them for a few minutes before serving. With these make-ahead options, you’ll always have a tasty and nutritious treat on hand without the last-minute fuss!
Peanut Butter Oat Cups Recipe FAQs
What type of peanut butter should I use?
Absolutely! For the best flavor and texture, I recommend using creamy or natural peanut butter. If you’re looking for a nut-free option, sunflower seed butter works wonderfully as a substitute. Just make sure whichever butter you choose is smooth and spreadable for easy mixing!
How should I store the Peanut Butter Oat Cups?
You can store your Peanut Butter Oat Cups in an airtight container in the refrigerator for up to one week. This will keep them soft, chewy, and full of flavor. If you want them even firmer, you can freeze them!
Can I freeze Peanut Butter Oat Cups?
Yes, definitely! To freeze, first place the Peanut Butter Oat Cups in a single layer on a baking sheet and freeze until firm. Then transfer them to a freezer-safe bag or container. They can last for up to 3 months! When you’re ready to enjoy them, just thaw at room temperature for about 5-10 minutes or pop them in the microwave for a few seconds.
What should I do if the mixture is too crumbly?
If your mixture seems too crumbly and isn’t holding together well, try adding a bit more peanut butter or maple syrup to help it bind. You can also let it sit for a few minutes; sometimes, the oats absorb moisture over time and the mixture becomes easier to mold.
Are Peanut Butter Oat Cups safe for those with allergies?
When adapting for allergies, ensure you use allergen-free alternatives. For nut allergies, swap peanut butter with sunflower seed butter. Additionally, double-check the chocolate chips to ensure they are dairy-free if needed. Always read labels to ensure they meet your dietary needs!
Delicious Peanut Butter Oat Cups You Can Make in Minutes
Ingredients
Equipment
Method
- In a medium mixing bowl, combine 1 cup of creamy peanut butter and 1/3 cup of maple syrup. Stir until smooth.
- Introduce 2 cups of old-fashioned rolled oats into the peanut butter mixture and fold until uniformly combined.
- Scoop about 2 tablespoons of the mixture into each silicon mold and press down firmly.
- Melt 1 cup of chocolate chips with 1 teaspoon of neutral oil in microwave-safe bowl, stirring until smooth.
- Refrigerate the cups for about 20 minutes. Add dollops of peanut butter on top.
- Drizzle melted chocolate over each cup and refrigerate for another 20 minutes.
- Remove from molds and sprinkle with flaky sea salt if desired before serving.
Leave a Reply