
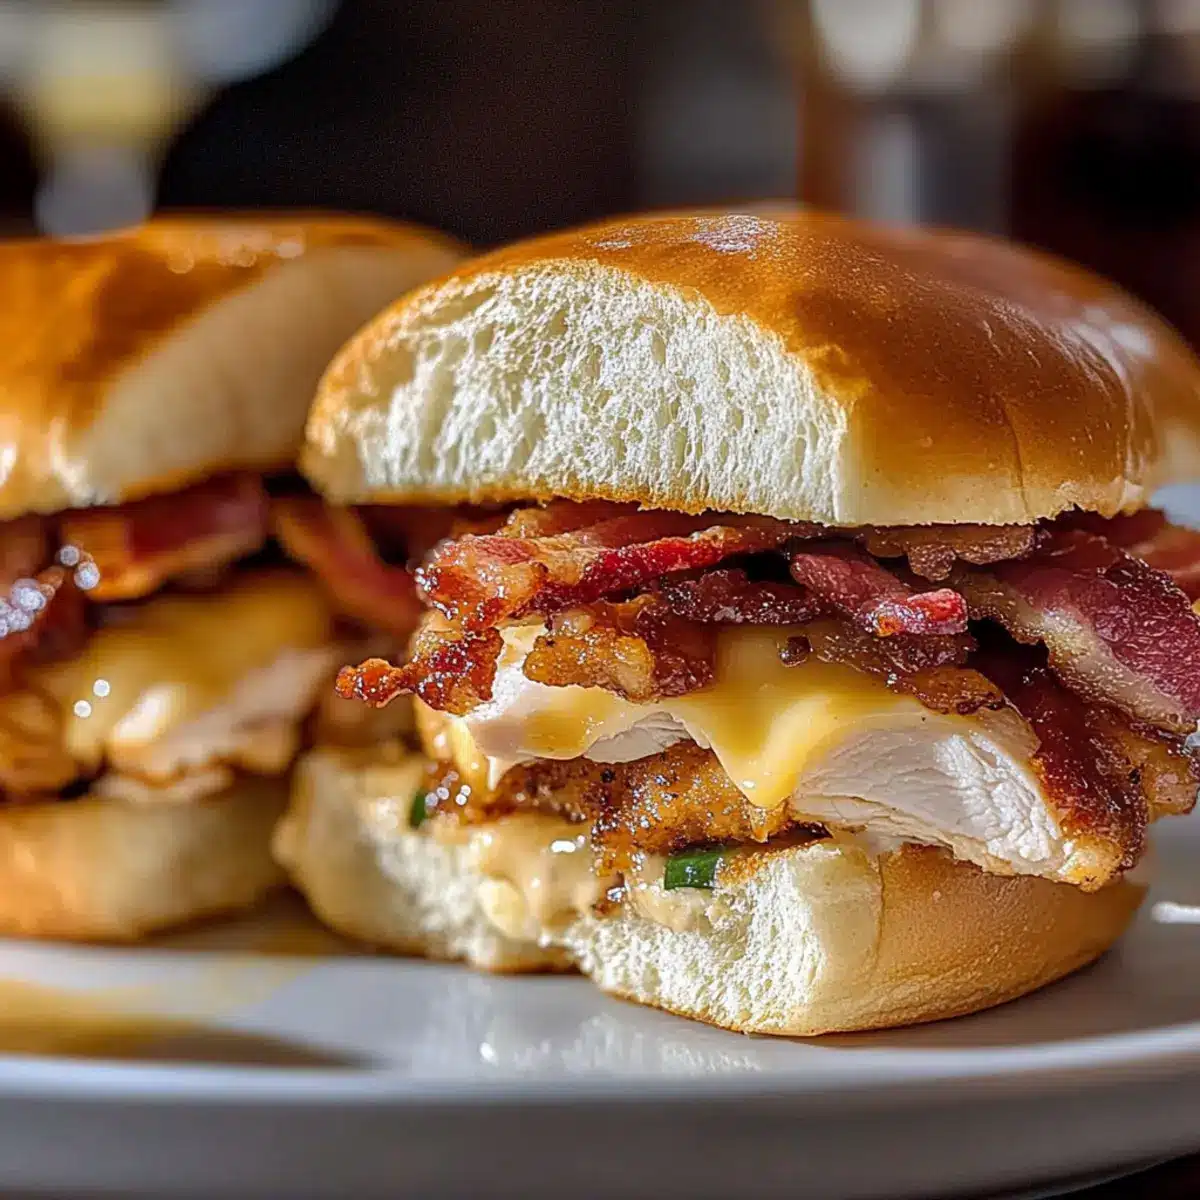
As I strolled through the local farmer’s market, the scent of maple glazed pastries wafted by, instantly igniting my craving for something sweet and savory. That inspired me to create these Easy Maple Chicken Bacon Sliders, a dish that perfectly embodies comfort food for any occasion. With tender chicken, crispy bacon, and layers of gooey cheese tucked between irresistible Hawaiian rolls, these sliders are quick to assemble and ready in no time—perfect for game day or casual brunches with friends. Plus, the versatility of this recipe shines through, with gluten-free and dairy-free options available to accommodate everyone at your table. Doesn’t that sound like a warm, satisfying treat you’d love to dive into? Let’s explore how to bring this delicious dish to life!

Why Are Maple Chicken Bacon Sliders So Amazing?
Irresistible Flavor: The sweet maple butter and savory bacon blend harmoniously, creating a taste explosion that delights every palate.
Quick Assembly: With minimal prep, these sliders are perfect for busy days or last-minute gatherings—simply layer and bake!
Dietary Flexibility: Options for gluten-free and dairy-free adjustments make these sliders accessible for all guests, ensuring no one misses out on the fun.
Crowd-Pleasing Comfort: Perfect for sharing at parties or family dinners, they bring people together over delicious, hearty bites—ideal for game day or casual brunches.
Customization Galore: Add a fresh twist by including greens or swapping cheeses, like trying out Chipotle Chicken Avocado for a spicy kick! Each bite of these sliders transports you to a place of cozy satisfaction.
Maple Chicken Bacon Sliders Ingredients
For the Sliders
• King’s Hawaiian Rolls – Soft and sweet, these rolls are the foundation for your sliders and perfect for a cozy bite.
• Cooked Chicken Breast Strips – The main protein, adding heartiness; rotisserie chicken can save you time.
• Gouda Cheese – Creamy and flavorful, it enhances the richness; feel free to swap with Swiss or cheddar for variety.
• Cooked Bacon – Provides a crunchy, smoky layer; turkey bacon or a plant-based option works great for lighter versions.
• Maple Butter – This sweet glaze ties everything together, but if you’re out, mix maple syrup into softened butter for a perfect replacement.
Optional Add-Ons
• Fresh Greens – Add baby spinach or arugula for a refreshing crunch before baking.
• Additional Cheese – Experiment with different cheeses like mozzarella for a fun twist.
These Maple Chicken Bacon Sliders are more than just delicious; they’re adaptable to suit any gathering and dietary need! Enjoy crafting your perfect slider.
Step‑by‑Step Instructions for Maple Chicken Bacon Sliders
Step 1: Preheat the Oven
Begin by preheating your oven to 375°F (190°C), ensuring it’s fully heated for even baking. This step is crucial as it helps the sliders cook to that perfect golden-brown finish. While the oven warms up, you can prepare the Hawaiian rolls for assembly.
Step 2: Prepare the Rolls
Carefully slice the King’s Hawaiian rolls horizontally while keeping the tops attached to the bottoms whenever possible. This creates a convenient base for your Maple Chicken Bacon Sliders. Place the bottom halves neatly in a baking dish or on a baking sheet to keep them organized for the next step.
Step 3: Add Maple Butter
Spread a generous layer of maple butter evenly across the bottom halves of the rolls. This sweet glaze adds rich flavor that ties the layers together. Make sure to coat it well so each bite of your Maple Chicken Bacon Sliders bursts with that delicious maple goodness.
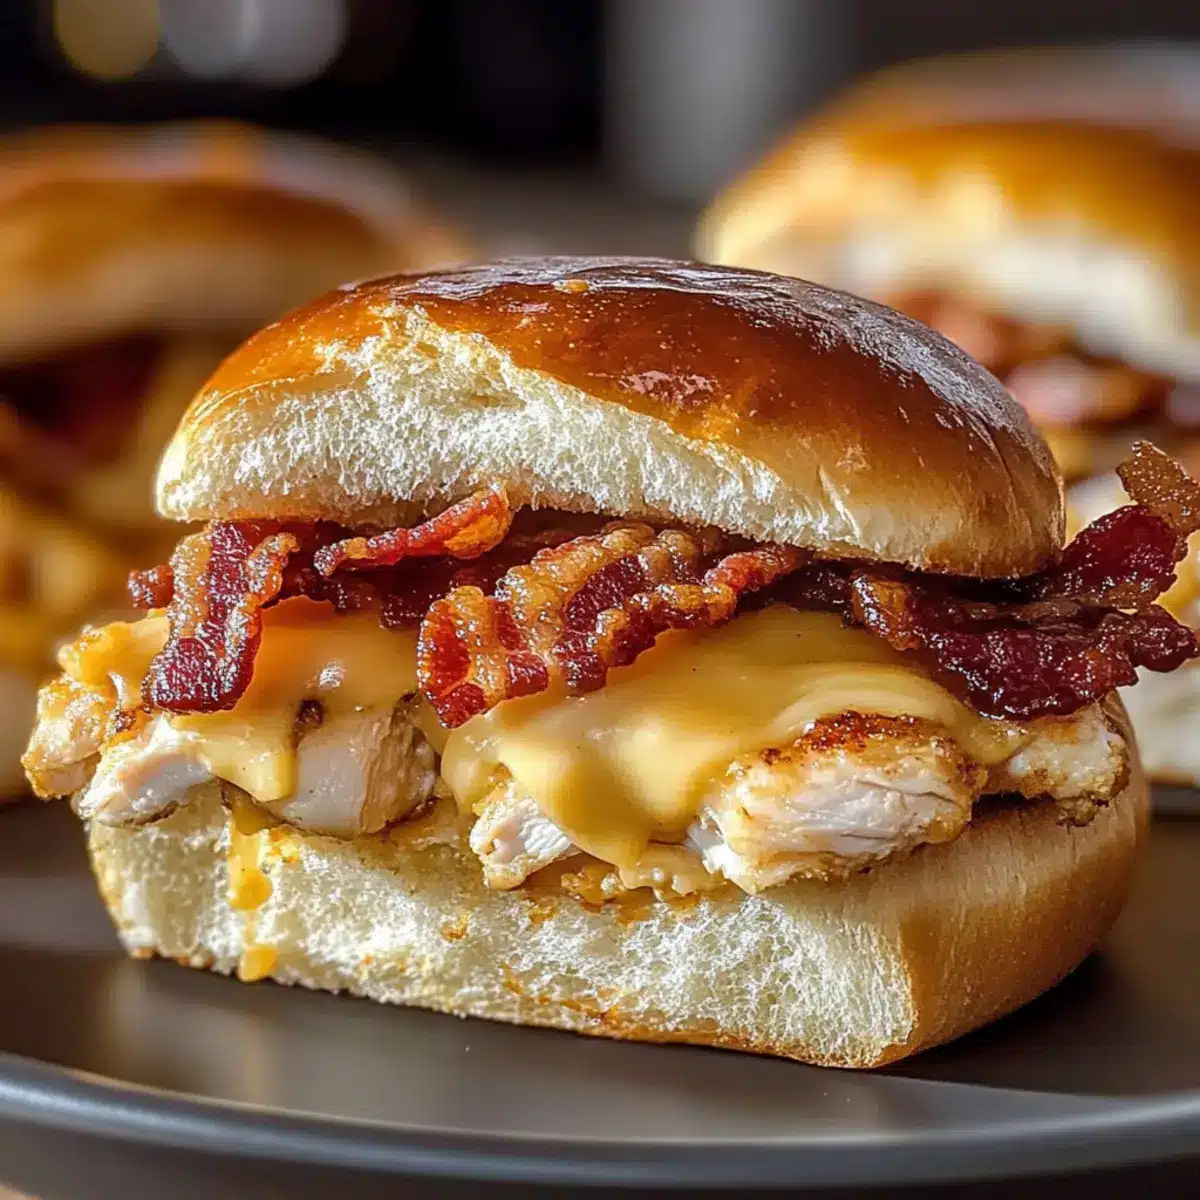
Step 4: Assemble the Filling
Layer the cooked chicken breast strips over the maple buttered rolls, ensuring they are evenly distributed. Next, place the crispy bacon slices on top of the chicken. The combination of tender chicken and smokey bacon creates a mouthwatering savory base for your sliders.
Step 5: Add Cheese
Now, top the chicken and bacon layers with generous slices of Gouda cheese, allowing it to melt beautifully during baking. You can mix in other cheese varieties if you like, enhancing the flavor profile. Once added, place the top halves of the Hawaiian rolls over the cheese, gently pressing them down to secure the filling.
Step 6: Bake
Transfer your assembled sliders to the preheated oven and bake for about 10-15 minutes. Keep an eye on them, and remove when the cheese is melted and the tops are lightly golden. This is where all the magic happens, creating those irresistible Maple Chicken Bacon Sliders.
Step 7: Finish and Serve
After baking, brush the tops of the sliders with a little extra maple butter for added sweetness. Once brushed, slice the sliders into individual pieces, making them easy to serve. Enjoy these warm and cheesy bites fresh from the oven, perfect for any gathering or cozy night in.

What to Serve with Maple Chicken Bacon Sliders
Elevate your gathering with these sliders by complementing them with delightful sides that add variety and flavor.
-
Leafy Green Salad: A fresh salad offers a crisp contrast to the warm, gooey sliders, enhancing the overall meal experience. Toss in a light vinaigrette for brightness.
-
Sweet Potato Fries: The sweet crunch of homemade or store-bought fries pairs perfectly with the savory flavors of the sliders and makes for a satisfying crunch.
-
Grilled Vegetable Skewers: Roasted bell peppers and zucchini bring vibrant colors and a smoky flavor that beautifully balance the richness of the sliders. Add a drizzle of balsamic glaze for extra flair.
-
Coleslaw: This creamy, tangy side adds a refreshing crunch that complements the savory sweetness of the sliders. It’s a classic accompaniment that’s always a hit at gatherings.
-
Fruit Platter: A colorful assortment of fresh fruits, like berries and melon, provides a sweet contrast to the sliders and keeps your meal light and refreshing.
-
Craft Beer or Hard Cider: Pair your sliders with a cold craft beer or fruity hard cider to enhance the meal’s flavors, making for a perfect match to sip while enjoying the game or a casual gathering.
Each pairing brings a mixture of textures and flavors, ensuring your Maple Chicken Bacon Sliders shine on your table!
Maple Chicken Bacon Sliders Variations
Feel free to get creative with these sliders and customize them to match your taste and dietary needs!
- Gluten-Free: Use gluten-free rolls to ensure everyone can enjoy these sliders without worry.
- Dairy-Free: Replace Gouda with a dairy-free cheese alternative like vegan mozzarella for a creamy texture.
- Spicy Kick: Add sliced jalapeños or a drizzle of hot sauce to introduce a delightful heat to the mix.
- Fresh Greens: Layer fresh spinach or arugula inside for a refreshing crunch and a pop of color before baking.
- Festive Flavor: Swap in leftover turkey and a generous dollop of cranberry sauce for a holiday-inspired twist.
- Sweet Heat: Mix chili sauce into your maple butter for a sweet and spicy glaze that adds more depth to the sliders.
- Cheese Variety: Experiment with different cheeses like pepper jack for heat or smoked gouda for an extra flavor twist.
- Herbed Hints: Incorporate fresh herbs, such as thyme or rosemary, into the chicken filling for an aromatic boost.
Don’t forget to explore pairing these sliders with light salads or roasted vegetables—it’s the perfect way to balance richness and flavor, just like with my Garlic Butter Chicken and Cranberry Orange Chicken recipes! Enjoy the deliciousness!
Expert Tips for Maple Chicken Bacon Sliders
• Prep Ahead: Assemble sliders in advance and refrigerate them. Bake just before serving for optimal freshness and flavor.
• Toasting Rolls: Lightly toast the Hawaiian rolls before adding fillings; this adds a delightful crunch and prevents sogginess.
• Maple Butter Timing: Brush extra maple butter on the sliders only right before serving to maintain a perfect texture and avoid sogginess.
• Cheese Choices: Experiment with different cheeses for unique flavor combinations. Gouda, cheddar, or pepper jack could add delicious twists.
• Slicing Technique: Use a serrated knife to slice the sliders for clean, even cuts. This ensures they hold together nicely when served.
Storage Tips for Maple Chicken Bacon Sliders
Fridge: Store leftover Maple Chicken Bacon Sliders in an airtight container for up to 2 days to keep them fresh and flavorful.
Freezer: For longer storage, individually wrap sliders in plastic wrap, then place them in a freezer bag. They can be frozen for up to 2 months.
Reheating: To reheat, thaw overnight in the fridge, then warm them in a covered oven at 350°F (175°C) for about 10-15 minutes until heated through.
Assembly Tip: If prepping ahead, assemble the sliders without baking, store in the fridge, then bake just before serving for a warm and inviting dinner experience.
Make Ahead Options
These Maple Chicken Bacon Sliders are perfect for busy home cooks looking to save time! You can assemble the sliders up to 24 hours in advance and refrigerate them until you’re ready to bake. To do so, layer the chicken, bacon, and cheese between the rolls, then cover them tightly with plastic wrap to keep them fresh. Avoid adding the maple butter until just before baking to prevent sogginess. When it’s time to serve, simply preheat your oven and bake the sliders for about 10-15 minutes until golden and melty. This way, you’ll enjoy the same cozy comfort with minimal effort!
Maple Chicken Bacon Sliders Recipe FAQs
How do I choose the best chicken for my sliders?
Absolutely! For the best flavor and texture in your Maple Chicken Bacon Sliders, I recommend using freshly cooked chicken breast strips. If you’re in a pinch, rotisserie chicken works great and saves time. Look for juicy, tender pieces without dark spots, which can indicate spoilage.
What’s the best way to store leftover sliders?
Store leftover Maple Chicken Bacon Sliders in an airtight container in the fridge for up to 2 days. This helps maintain their delightful flavors. To reheat, I suggest warming them in a covered oven at 350°F (175°C) for about 10 minutes, so they come out warm and cheesy without becoming soggy.
Can I freeze these sliders, and if so, how?
Of course! To freeze Maple Chicken Bacon Sliders, wrap each slider individually in plastic wrap, then place them in a freezer bag for up to 2 months. When you’re ready to enjoy them, thaw overnight in the fridge. Reheat them in a covered oven at 350°F (175°C) for roughly 10-15 minutes until heated through. This method keeps them tasting freshly baked!
What if my cheese doesn’t melt properly while baking?
Not a problem! If you find your cheese isn’t melting to your satisfaction, make sure you’re using a good melting cheese like Gouda or cheddar. Also, ensure your oven is preheated correctly and avoid overcrowding the pan. For an extra boost, you can switch to a broiler setting for the last minute of baking to achieve that gooey, melty finish.
Are there any allergy considerations with the ingredients?
Very! If you’re catering to allergies or dietary preferences, be sure to check for gluten-free versions of King’s Hawaiian Rolls and dairy-free cheeses as alternatives. Always ask your guests about their allergies when planning your menu, so everyone can enjoy your delicious Maple Chicken Bacon Sliders without worry.
Irresistible Maple Chicken Bacon Sliders for Cozy Gatherings
Ingredients
Equipment
Method
- Preheat your oven to 375°F (190°C) to ensure even baking.
- Slice the King's Hawaiian rolls horizontally, keeping the tops attached wherever possible.
- Spread a generous layer of maple butter on the bottom halves of the rolls.
- Layer the cooked chicken breast strips over the maple butter, followed by crispy bacon.
- Top with generous slices of Gouda cheese and press down lightly with the top halves of the rolls.
- Bake in the preheated oven for about 10-15 minutes or until cheese melts and tops are golden.
- Brush the tops with extra maple butter, slice into pieces, and serve warm.
Leave a Reply